- 登录rabbitMQ管理界面时浏览器显示要求进行身份验证,与此站点连接
- Flask三种文件下载方法
- MySQL一对多查询
- Access denied for user ‘‘@‘localhos
- 【问题】本地计算机上的MySQL服务启动后停止。某些服务在未有其他服务
- Tomcat与Netty比较
- Docker高级——Docker部署RabbitMQ(单机,集群,仲裁
- Spring Cloud配置application.yml与boots
- 2.3 如何使用FlinkSQL读取&写入到JDBC(MySQ
- spring boot 使用AOP+自定义注解+反射实现操作日志记录修
- SQL之存储过程
- npm : 无法将“npm”项识别为 cmdlet、函数、脚本文件或可
- SpringBoot:解决Property ‘spring.profi
- 大数据技术(林子雨版)——期末复习知识点
- 1. GO 之基础命令
- 解决思路:504 Gateway Time-out
- Azure Machine Learning - 如何使用 GPT-4
- Flink Table API 与 SQL 编程整理
- MySQL以及版本介绍
- 基于SpringBoot快速使用Netty - 客户端
- 【数据库】忘记mysql本地密码
- MyBatis 动态SQL之<where>标签-
- 十九、MySQL 循环结构之LOOP、WHILE、REPEAT、LEA
- SQL 将查询结果插入到另一张表中
- node.js调用C++的一种方案
- 【Java面试篇】Spring中@Transactional注解事务失
- SpringBoot动态导出word文档(完美实整教程 复制即可使用,
- 解决MySQL-this is incompatible with s
- 【Spring篇】AOP事务管理
- java多线程带返回值的方式方法
spring boot中常用的安全框架
Security 和 Shiro 框架
Security 两大核心功能 认证 和 授权
重量级
Shiro 轻量级框架 不限于web 开发
在不使用安全框架的时候
一般我们利用过滤器和 aop自己实现 权限验证 用户登录
Security 实现逻辑
- 输入用户名和密码 提交
- 把提交用户名和密码封装对象
3、4 调用方法实现验证
5、调用方法、根据用户米查询用户信息
6、查询用户信息返回对象
7、密码比较
8、填充回、返回
9、返回对象放到上下文对象里面
引入依赖
            org.springframework.boot
            spring-boot-starter-security
刚开始测试的话 默认密码在控制台
把Security框架 使用到自己项目中
具体核心组件
- 第一步、登录接口 判断用户名和密码
自定义以下组件
1、 创建自己相对应的User 实体类 继承 org.springframework.security.core.userdetails.User
在里面定义自己的实体类字段和实现一个CustomUser()方法
package com.oa.security.custom;
import com.oa.model.system.SysUser;
import org.springframework.security.core.GrantedAuthority;
import org.springframework.security.core.userdetails.User;
import java.util.Collection;
public class CustomUser extends User {
    /**
     * 我们自己的用户实体对象,要调取用户信息时直接获取这个实体对象。(这里我就不写get/set方法了)
     */
    private SysUser sysUser;
    public CustomUser(SysUser sysUser, Collection authorities) {
        super(sysUser.getUsername(), sysUser.getPassword(), authorities);
        this.sysUser = sysUser;
    }
    public SysUser getSysUser() {
        return sysUser;
    }
    public void setSysUser(SysUser sysUser) {
        this.sysUser = sysUser;
    }
}
2、 重写 loadUserByUsername 方法
自定义一个 UserDetailsService 接口
继承org.springframework.security.core.userdetails.UserDetailsService 下的这个类
重写 UserDetailsService里的 loadUserByUsername方法
自定义一个 UserDetailsService 接口 的具体实现类 就是去数据库验证的实现类 比如 UserDetailsServiceImpl
在这个类 实现 loadUserByUsername 方法
实现后 最后返回 第一步创建的自定义的User 实体类
因为自己自定义的User类继承了UserDetails类
所以等于把数据交给了Security框架
UserDetailsService 接口
package com.oa.security.custom;
import org.springframework.security.core.userdetails.UserDetails;
import org.springframework.security.core.userdetails.UsernameNotFoundException;
import org.springframework.stereotype.Component;
@Component
public interface UserDetailsService extends org.springframework.security.core.userdetails.UserDetailsService {
    /**
     * 根据用户名获取用户对象(获取不到直接抛异常)
     */
    @Override
    UserDetails loadUserByUsername(String username) throws UsernameNotFoundException;
}
UserDetailsServiceImpl实现接口
package com.oa.auth.service.impl;
import com.oa.auth.service.SysMenuService;
import com.oa.auth.service.SysUserService;
import com.oa.model.system.SysUser;
import com.oa.security.custom.CustomUser;
import org.springframework.beans.factory.annotation.Autowired;
import org.springframework.security.core.authority.SimpleGrantedAuthority;
import org.springframework.security.core.userdetails.UserDetails;
import org.springframework.security.core.userdetails.UserDetailsService;
import org.springframework.security.core.userdetails.UsernameNotFoundException;
import org.springframework.stereotype.Service;
import java.util.ArrayList;
import java.util.List;
@Service
public class UserDetailsServiceImpl implements UserDetailsService {
    @Autowired
    private SysUserService sysUserService;

    @Autowired
    private SysMenuService sysMenuService;
    @Override
    public UserDetails loadUserByUsername(String username) throws UsernameNotFoundException {
        //根据用户名进行查询
        SysUser sysUser = sysUserService.getUserByUserName(username);
        if(null == sysUser) {
            throw new UsernameNotFoundException("用户名不存在!");
        }
        if(sysUser.getStatus().intValue() == 0) {
            throw new RuntimeException("账号已停用");
        }
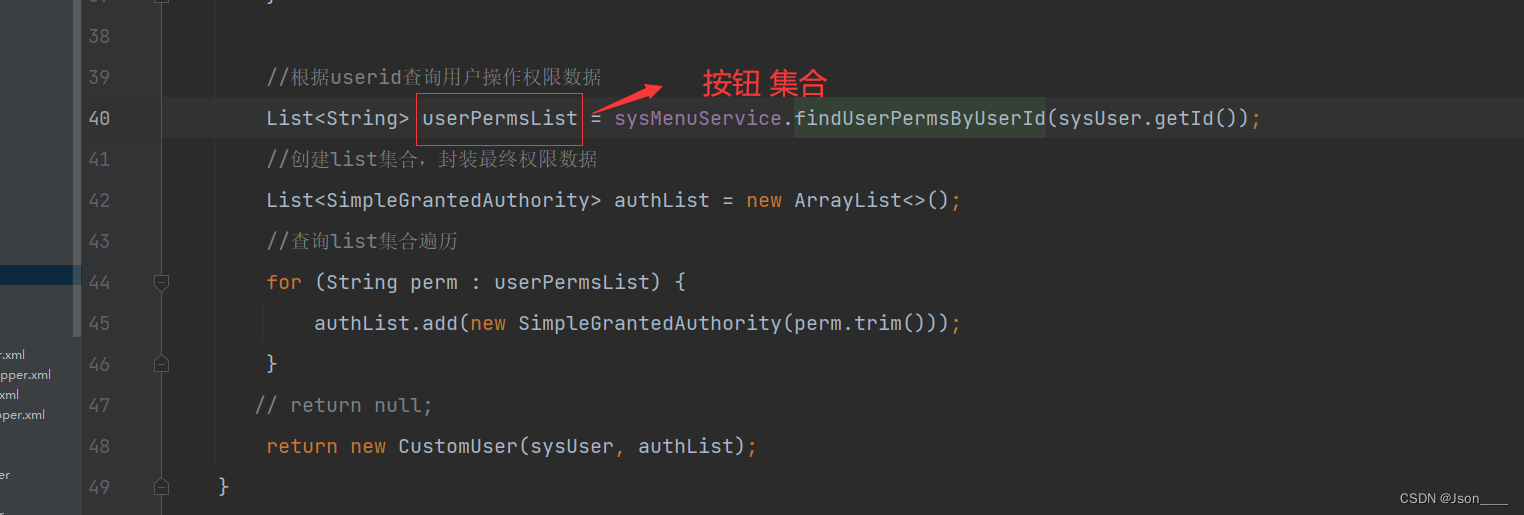
        //根据userid查询用户操作权限数据
        List userPermsList = sysMenuService.findUserPermsByUserId(sysUser.getId());
        //创建list集合,封装最终权限数据
        List authList = new ArrayList<>();
        //查询list集合遍历
        for (String perm : userPermsList) {
            authList.add(new SimpleGrantedAuthority(perm.trim()));
        }
       // return null;
        return new CustomUser(sysUser, authList);
    }
}
3、 自定义一个秘密校验器 CustomMd5PasswordEncoder 实现 org.springframework.security.crypto.password.PasswordEncoder 接口
package com.oa.security.custom;
import com.oa.common.utils.MD5;
import org.springframework.security.crypto.password.PasswordEncoder;
import org.springframework.stereotype.Component;
@Component
public class CustomMd5PasswordEncoder implements PasswordEncoder {
    public String encode(CharSequence rawPassword) {
        return MD5.encrypt(rawPassword.toString());
    }
    public boolean matches(CharSequence rawPassword, String encodedPassword) {
        return encodedPassword.equals(MD5.encrypt(rawPassword.toString()));
    }
}
4、 创建一个过滤器 来验证token 比如 TokenLoginFilter
继承 org.springframework.security.web.authentication.UsernamePasswordAuthenticationFilter
在方法里 定义四个方法 都是重写父类方法
定义一个构造方法
登录认证方法 获取输入的用户名和密码,调用方法认证 attemptAuthentication() 进行账号密码认证 认证实际就是执行了我们设置的第一步的内容
认证成功调用方法 successfulAuthentication() 如果认证成功 这个方法里 就处理比如生成token 存入权限 等
认证失败调用方法 unsuccessfulAuthentication() 如果认证失败 这个方法里 就处理失败的逻辑
package com.oa.security.filter;
import com.alibaba.fastjson.JSON;
import com.fasterxml.jackson.databind.ObjectMapper;
import com.oa.common.jwt.JwtHelper;
import com.oa.common.result.ResponseUtil;
import com.oa.common.result.Result;
import com.oa.common.result.ResultCodeEnum;
import com.oa.security.custom.CustomUser;
import com.oa.vo.system.LoginVo;
import org.springframework.data.redis.core.RedisTemplate;
import org.springframework.security.authentication.AuthenticationManager;
import org.springframework.security.authentication.UsernamePasswordAuthenticationToken;
import org.springframework.security.core.Authentication;
import org.springframework.security.core.AuthenticationException;
import org.springframework.security.web.authentication.UsernamePasswordAuthenticationFilter;
import org.springframework.security.web.util.matcher.AntPathRequestMatcher;
import javax.servlet.FilterChain;
import javax.servlet.ServletException;
import javax.servlet.http.HttpServletRequest;
import javax.servlet.http.HttpServletResponse;
import java.io.IOException;
import java.util.HashMap;
import java.util.Map;
public class TokenLoginFilter extends UsernamePasswordAuthenticationFilter {
    private RedisTemplate redisTemplate;
    //构造方法
    public TokenLoginFilter(AuthenticationManager authenticationManager,
                            RedisTemplate redisTemplate) {
        this.setAuthenticationManager(authenticationManager);
        this.setPostOnly(false);
        //指定登录接口及提交方式,可以指定任意路径 安全框架会从这个接口里取相应数据
        this.setRequiresAuthenticationRequestMatcher(new AntPathRequestMatcher("/admin/system/index/login","POST"));
        this.redisTemplate = redisTemplate;
    }
    //登录认证
    //获取输入的用户名和密码,调用方法认证
    public Authentication attemptAuthentication(HttpServletRequest request,
 HttpServletResponse response)
            throws AuthenticationException {
        try {
            //获取用户信息  实际就是获取的登录接口的 那个实体类里的数据
            LoginVo loginVo = new ObjectMapper().readValue(request.getInputStream(), LoginVo.class);
            //封装对象 然后把用户名和密码 传入进去
            Authentication authenticationToken =
                    new UsernamePasswordAuthenticationToken(loginVo.getUsername(), loginVo.getPassword());
            //调用方法
            return this.getAuthenticationManager().authenticate(authenticationToken);
        } catch (IOException e) {
            throw new RuntimeException(e);
        }
    }
    //认证成功调用方法
    protected void successfulAuthentication(HttpServletRequest request,
                                            HttpServletResponse response,
                                            FilterChain chain,
                                            Authentication auth)
            throws IOException, ServletException {
        //获取当前用户
        CustomUser customUser = (CustomUser)auth.getPrincipal();
        //生成token
        String token = JwtHelper.createToken(customUser.getSysUser().getId(),
                customUser.getSysUser().getUsername());
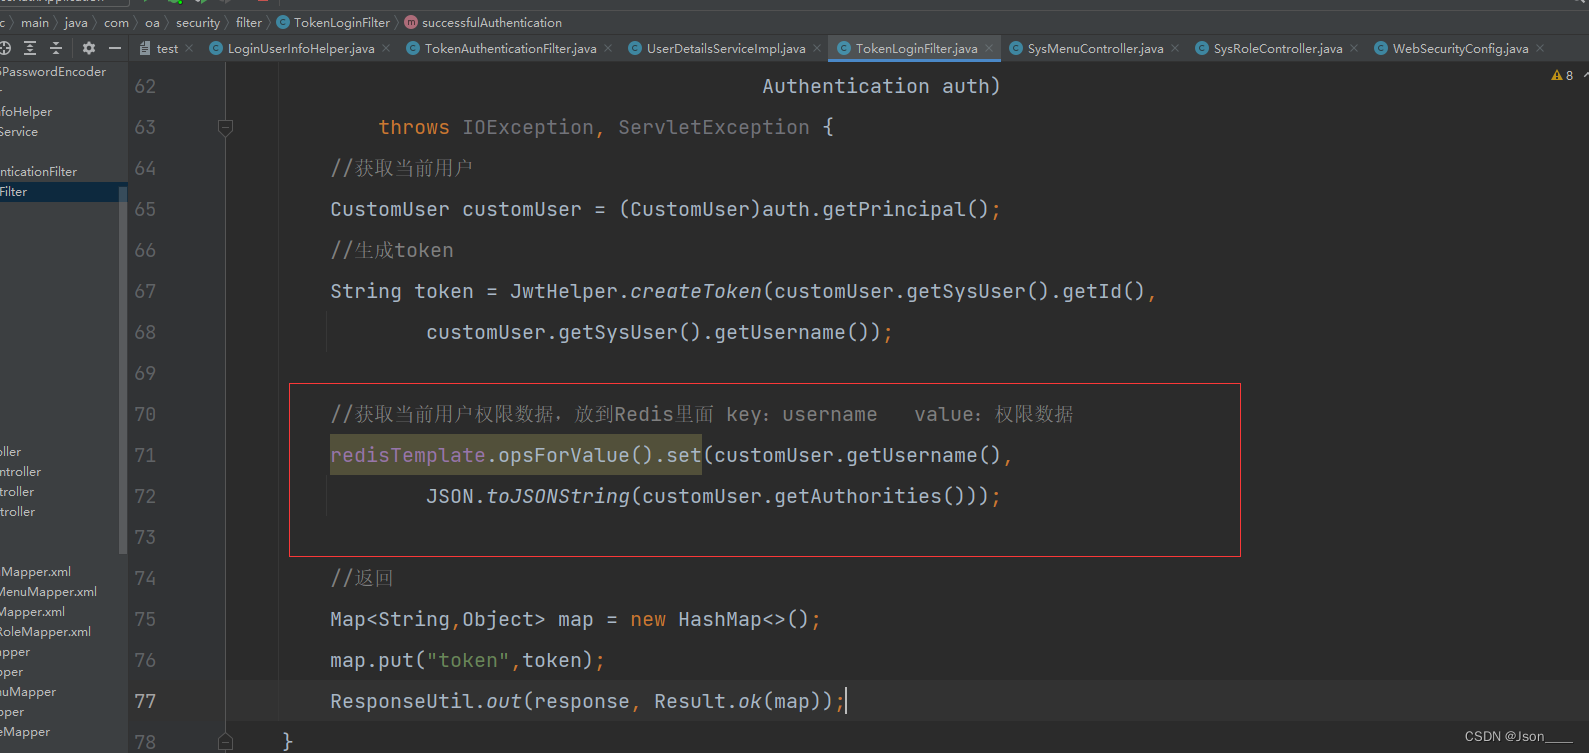
        //获取当前用户权限数据,放到Redis里面 key:username   value:权限数据
        redisTemplate.opsForValue().set(customUser.getUsername(),
                JSON.toJSONString(customUser.getAuthorities()));
        //返回
        Map map = new HashMap<>();
        map.put("token",token);
        ResponseUtil.out(response, Result.ok(map));
    }
    //认证失败调用方法
    protected void unsuccessfulAuthentication(HttpServletRequest request,
                                              HttpServletResponse response,
                                              AuthenticationException failed)
            throws IOException, ServletException {
        ResponseUtil.out(response,Result.build(null, ResultCodeEnum.LOGIN_ERROR));
    }
}
以上就是用户调用登录接口 利用Security框架 完成登录
第二步、认证解析token组件:解决调用其他接口时 看看用户有没有登录
判断请求头是否有token 如果有,认证完成 (通俗一点就是 判断当前是否登录)
自定义一个 TokenAuthenticationFilter 继承 org.springframework.web.filter.OncePerRequestFilter;
重写 里面的方法 doFilterInternal()
package com.oa.security.filter;
import com.alibaba.fastjson.JSON;
import com.oa.common.jwt.JwtHelper;
import com.oa.common.result.ResponseUtil;
import com.oa.common.result.Result;
import com.oa.common.result.ResultCodeEnum;
import com.oa.security.custom.LoginUserInfoHelper;
import org.springframework.data.redis.core.RedisTemplate;
import org.springframework.security.authentication.UsernamePasswordAuthenticationToken;
import org.springframework.security.core.authority.SimpleGrantedAuthority;
import org.springframework.security.core.context.SecurityContextHolder;
import org.springframework.util.StringUtils;
import org.springframework.web.filter.OncePerRequestFilter;
import javax.servlet.FilterChain;
import javax.servlet.ServletException;
import javax.servlet.http.HttpServletRequest;
import javax.servlet.http.HttpServletResponse;
import java.io.IOException;
import java.util.ArrayList;
import java.util.List;
import java.util.Map;
public class TokenAuthenticationFilter extends OncePerRequestFilter {
private RedisTemplate redisTemplate;
public TokenAuthenticationFilter(RedisTemplate redisTemplate) {
this.redisTemplate = redisTemplate;
}
@Override
protected void doFilterInternal(HttpServletRequest request,
HttpServletResponse response,
FilterChain chain) throws ServletException, IOException {
//如果是登录接口,直接放行
if("/admin/system/index/login".equals(request.getRequestURI())) {
chain.doFilter(request, response);
return;
}
UsernamePasswordAuthenticationToken authentication = getAuthentication(request);
if(null != authentication) {
SecurityContextHolder.getContext().setAuthentication(authentication);
chain.doFilter(request, response);
} else {
ResponseUtil.out(response, Result.build(null, ResultCodeEnum.LOGIN_ERROR));
}
}
private UsernamePasswordAuthenticationToken getAuthentication(HttpServletRequest request) {
//请求头是否有token
String token = request.getHeader("token");
if(!StringUtils.isEmpty(token)) {
String username = JwtHelper.getUsername(token);
if(!StringUtils.isEmpty(username)) {
//当前用户信息放到ThreadLocal里面
LoginUserInfoHelper.setUserId(JwtHelper.getUserId(token));
LoginUserInfoHelper.setUsername(username);
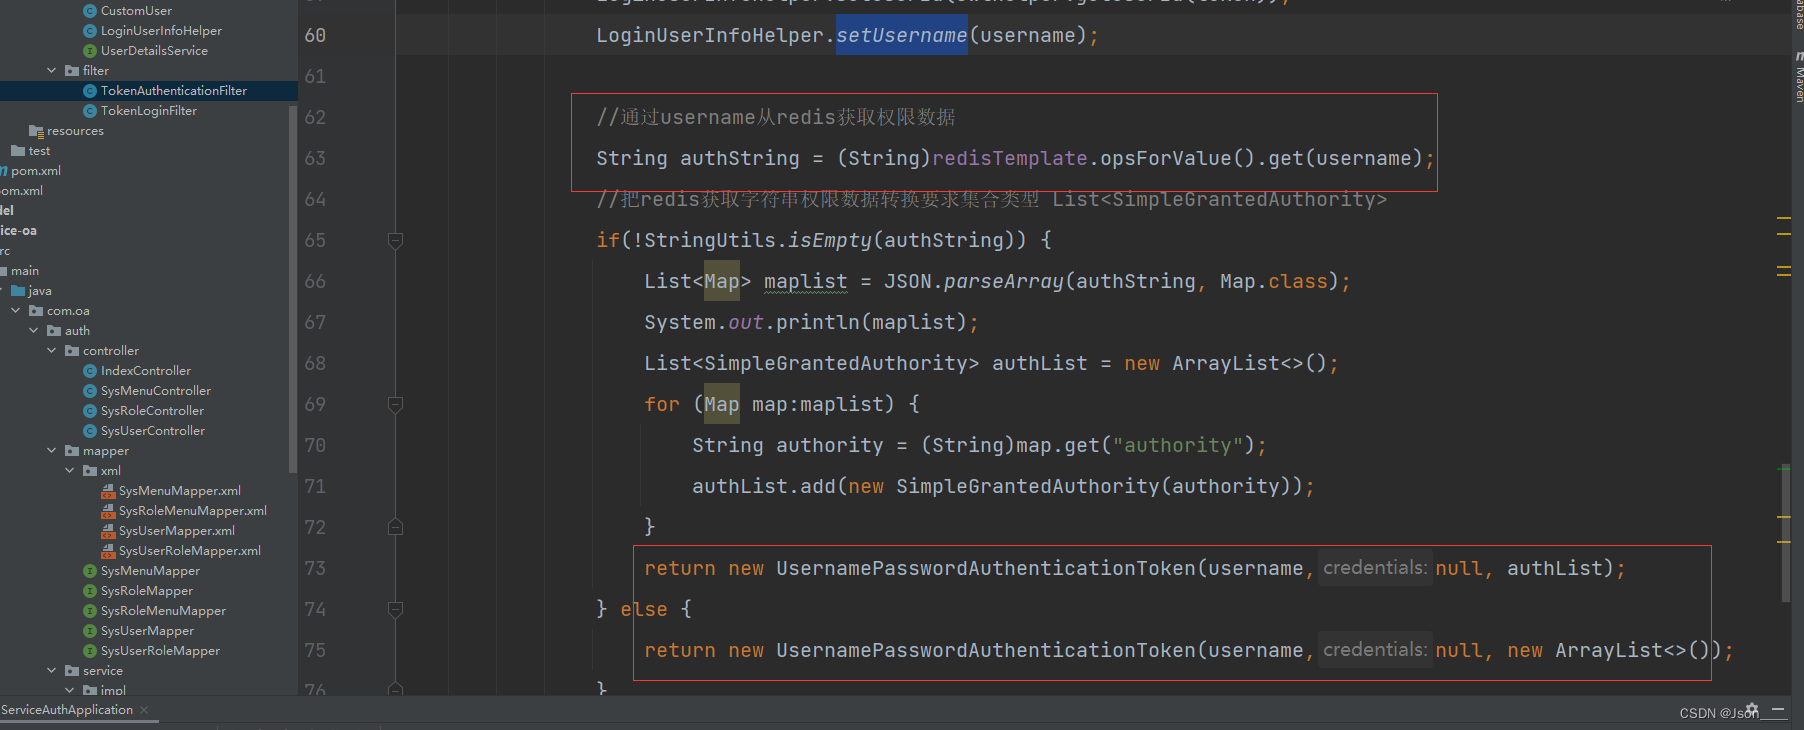
//通过username从redis获取权限数据
String authString = (String)redisTemplate.opsForValue().get(username);
//把redis获取字符串权限数据转换要求集合类型 List
if(!StringUtils.isEmpty(authString)) {
List
第三步、在配置类配置相关认证类
package com.oa.security.config;
import com.oa.security.custom.CustomMd5PasswordEncoder;
import com.oa.security.filter.TokenAuthenticationFilter;
import com.oa.security.filter.TokenLoginFilter;
import org.springframework.beans.factory.annotation.Autowired;
import org.springframework.context.annotation.Bean;
import org.springframework.context.annotation.Configuration;
import org.springframework.data.redis.core.RedisTemplate;
import org.springframework.security.authentication.AuthenticationManager;
import org.springframework.security.config.annotation.authentication.builders.AuthenticationManagerBuilder;
import org.springframework.security.config.annotation.method.configuration.EnableGlobalMethodSecurity;
import org.springframework.security.config.annotation.web.builders.HttpSecurity;
import org.springframework.security.config.annotation.web.builders.WebSecurity;
import org.springframework.security.config.annotation.web.configuration.EnableWebSecurity;
import org.springframework.security.config.annotation.web.configuration.WebSecurityConfigurerAdapter;
import org.springframework.security.config.http.SessionCreationPolicy;
import org.springframework.security.core.userdetails.UserDetailsService;
import org.springframework.security.web.authentication.UsernamePasswordAuthenticationFilter;
@Configuration
@EnableWebSecurity //@EnableWebSecurity是开启SpringSecurity的默认行为
@EnableGlobalMethodSecurity(prePostEnabled = true)
public class WebSecurityConfig extends WebSecurityConfigurerAdapter {
    @Autowired
    private RedisTemplate redisTemplate;
    //导入这个接口的时候 有可能会报错找不到这个类
    //我们有自己创建了一个 UserDetailsService 接口
    // 如果导入我们的 也会报错
    // 解决方案就是 把我们自定义的 UserDetailsService 接口 继承 框架下的UserDetailsService
    // 就可以了
    @Autowired
    private UserDetailsService userDetailsService;
    @Autowired
    private CustomMd5PasswordEncoder customMd5PasswordEncoder;
    @Bean
    @Override
    protected AuthenticationManager authenticationManager() throws Exception {
        return super.authenticationManager();
    }
    @Override
    protected void configure(HttpSecurity http) throws Exception {
        // 这是配置的关键,决定哪些接口开启防护,哪些接口绕过防护
        http
                //关闭csrf跨站请求伪造
                .csrf().disable()
                // 开启跨域以便前端调用接口
                .cors().and()
                .authorizeRequests()
                // 指定某些接口不需要通过验证即可访问。登陆接口肯定是不需要认证的
                //.antMatchers("/admin/system/index/login").permitAll()
                // 这里意思是其它所有接口需要认证才能访问
                .anyRequest().authenticated()
                .and()
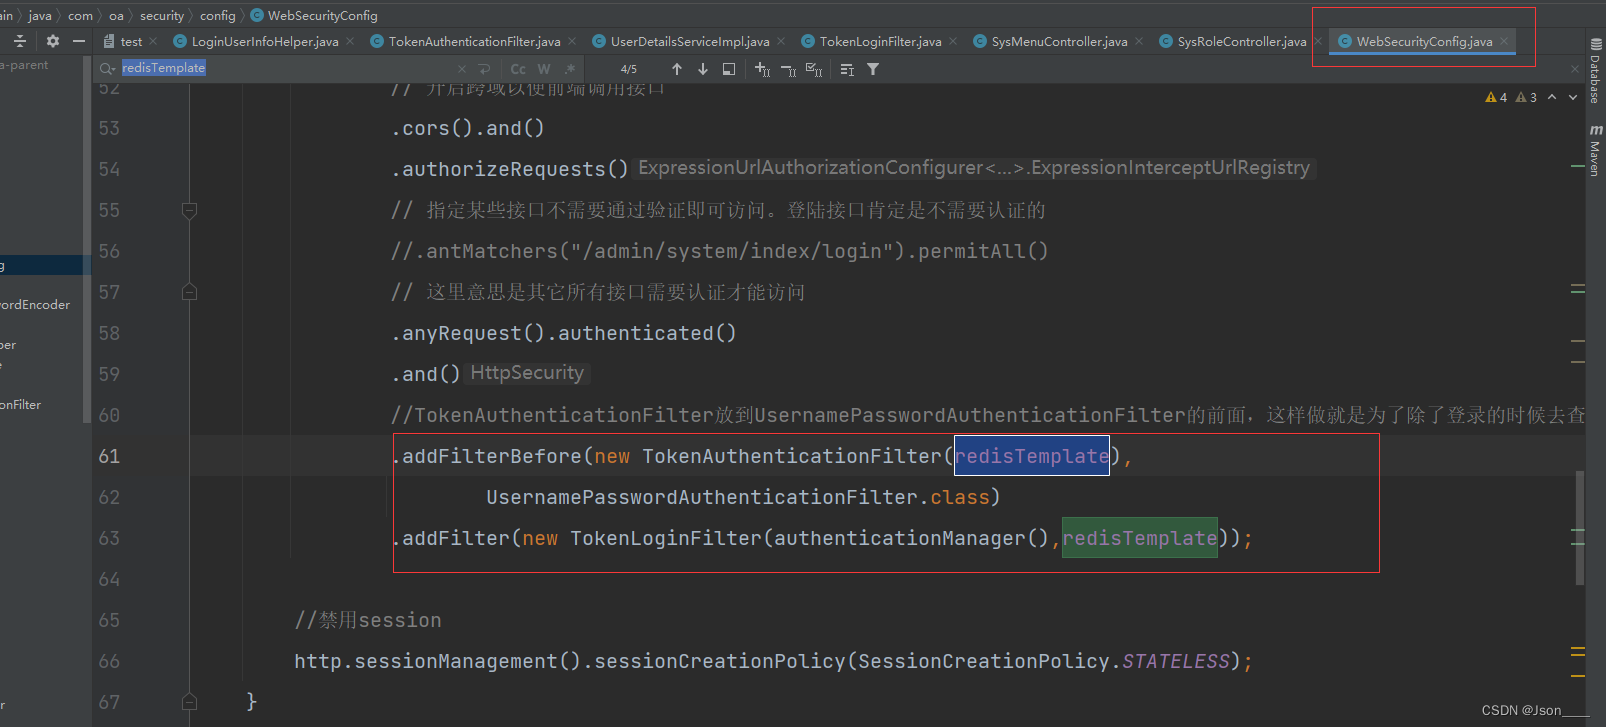
                //TokenAuthenticationFilter放到UsernamePasswordAuthenticationFilter的前面,这样做就是为了除了登录的时候去查询数据库外,其他时候都用token进行认证。
                .addFilterBefore(new TokenAuthenticationFilter(redisTemplate),
                        UsernamePasswordAuthenticationFilter.class)
                .addFilter(new TokenLoginFilter(authenticationManager(),redisTemplate));
        //禁用session
        http.sessionManagement().sessionCreationPolicy(SessionCreationPolicy.STATELESS);
    }
    @Override
    protected void configure(AuthenticationManagerBuilder auth) throws Exception {
        // 指定UserDetailService和加密器
        auth.userDetailsService(userDetailsService).passwordEncoder(customMd5PasswordEncoder);
    }
    /**
     * 配置哪些请求不拦截
     * 排除swagger相关请求
     * @param web
     * @throws Exception
     */
    @Override
    public void configure(WebSecurity web) throws Exception {
        web.ignoring().antMatchers("/admin/modeler/**","/diagram-viewer/**","/editor-app/**","/*.html",
                "/admin/processImage/**",
                "/admin/wechat/authorize","/admin/wechat/userInfo","/admin/wechat/bindPhone",
                "/favicon.ico","/swagger-resources/**", "/webjars/**", "/v2/**", "/swagger-ui.html/**", "/doc.html");
    }
}
用户授权
代码在上面的类里已经存在,这里只截图提现
比如按钮权限 哪些按钮课余访问
这些按钮权限 在 数据库存着 一般是给前端使用
但是这种操作 如果懂技术的人 可以绕过前端 直接访问后端api接口
为了解决这个问题 所以后端也需要做用户授权
第一步 在查询用户名密码验证的时候 把用户的按钮权限查询出来
一个按钮一般对应的是一个接口
然后交给 Security框架

第二步验证成功后,给前端返回token 那里从Security框架里拿出 按钮权限
然后存到redis里

第三步用户在请求接口的时候 这个时候把从redis里把当前用户的按钮权限拿出来
然后验证

第四步 在Security配置文件中添加上redis配置

第五步 在控制器里 controller 里添加权限注解
@PreAuthorize(“hasAuthority(‘bnt.sysRole.list’)”)
//bnt.sysRole.list 这个值 就是存在数据库里的按钮的字段 前端和后端可以共同使用

最后在定义以下异常处理类
  /**
     * spring security异常
     * @param e
     * @return
     */
    @ExceptionHandler(AccessDeniedException.class)
    @ResponseBody
    public Result error(AccessDeniedException e) throws AccessDeniedException {
        return Result.fail().code(205).message("没有操作权限");
    }
这样 验证和 授权 就全部完成了


